Arrivy & HubSpot
HubSpot is a popular CRM for growing sales organizations. With Arrivy’s HubSpot integration, Sales and Support teams on HubSpot can now cooperate smoothly with the Operations/Dispatch teams on Arrivy and handoff Tasks seamlessly while providing an engaging customer experience.
The HubSpot-Arrivy integration allows you to:
- Create Arrivy Tasks from HubSpot Deals, Tickets, and Contacts
- Seamlessly map fields between HubSpot Deals, Tickets, Contacts, and their associated objects data and Arrivy Tasks
- Enhance communication between Sales, Operations/Dispatch, and end customers
With Arrivy’s HubSpot app, your Sales and Support teams on HubSpot can now cooperate smoothly with your Operations/Dispatch team on Arrivy and hand off tasks seamlessly while providing an engaging customer experience.
Setup and installation
In HubSpot
To begin, install the Arrivy app via the HubSpot marketplace. As part of the installation, you will be prompted for permission to give Arrivy access to your HubSpot data. This is needed to fetch information to create tasks in Arrivy.
 Arrivy App Listed in HubSpot Marketplace
In Arrivy
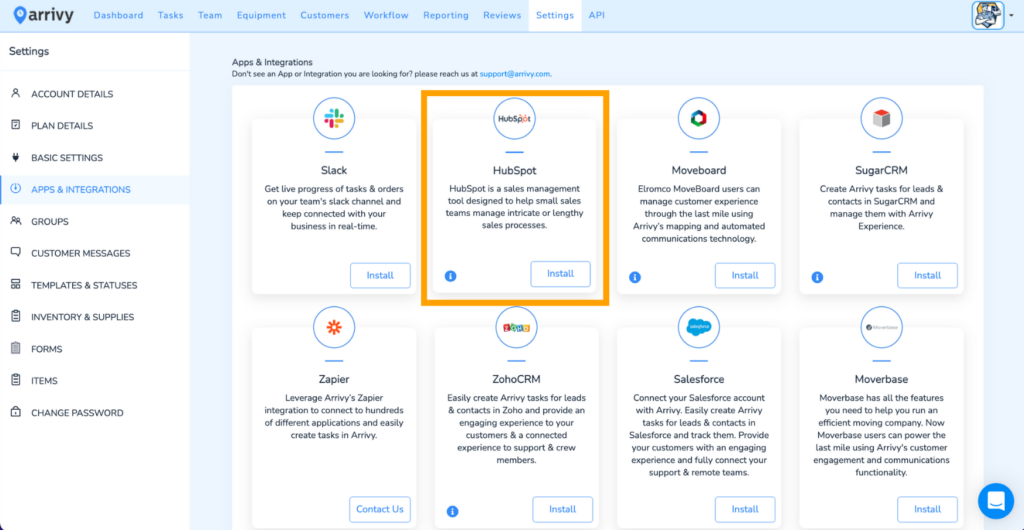
To link your HubSpot account with Arrivy, go to Settings → Apps & Integrations and locate the HubSpot card. Click install after which you will be prompted to proceed with your login.
HubSpot Integration Card Within Arrivy
You’ll be prompted to log into HubSpot. After logging in, you will be prompted to grant access permission. After granting permissions, you’ll see several configuration options (you may need to navigate back to Settings → Apps & Integrations → HubSpot and click on the installed button again).
HubSpot Integration Configuration With Arrivy Settings
Integration options include:
- Integration time zone: This must be set to the same time zone specified in HubSpot Settings → Account defaults → General Info → Time Zone.
- In Arrivy, Tasks can either be scheduled or unscheduled:
- Scheduled Tasks need Start/End dates and times. As soon as a scheduled task is created (either manually or through the API), the Task Created customer message is sent via SMS or email. If a Task’s date or time is changed, then a Task Rescheduled message is sent to the customer when the Task is synced. Note that if your Synchronization time is set to 11:30 PM, that is when your customer will be receiving these messages. All scheduled Tasks appear on the calendar.
- An unscheduled task can have a time and a date, just a date, or neither a time nor a date. In Arrivy, unscheduled tasks appear in the unscheduled list view under the Tasks tab, and unscheduled tasks with dates will appear in Calendar views. In the case of an unscheduled Task, no communication is sent to the customer. However, changing a Task from unscheduled to scheduled will generate a Task Scheduled customer message.
- JSON Mapping: This advanced feature lets you map any HubSpot fields to Arrivy fields. Please reach out to our support team at support@arrivy.com to help with field mapping.
- Deal Stages: HubSpot deal stage ids are needed to create/update Tasks in Arrivy (a comma should separate multiple stages “,”). You can get these ids in HubSpot Settings → Data Management → Deals → Pipelines → Configure, as shown in the screenshot below.
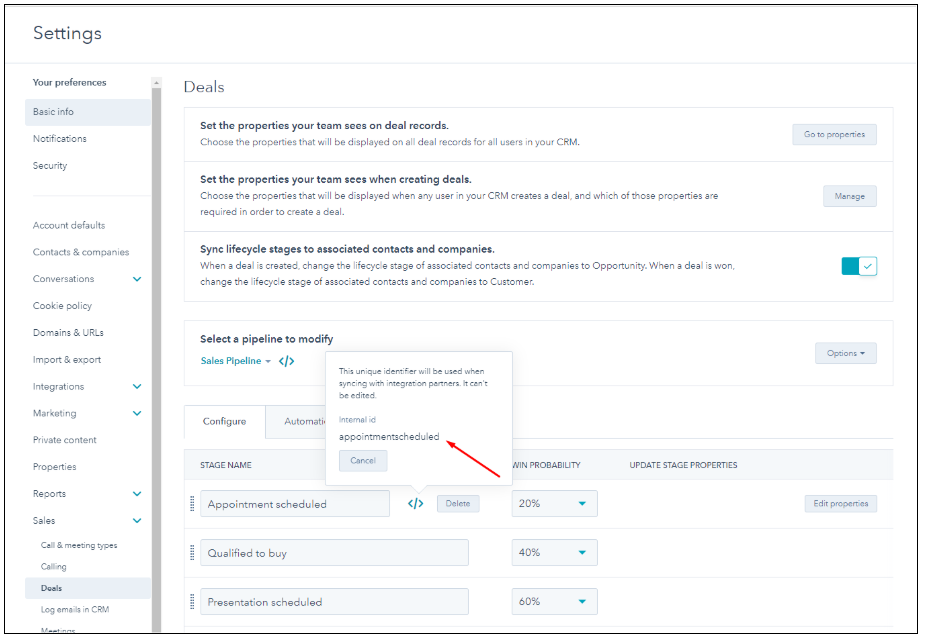 How to Get Deal Stage IDs
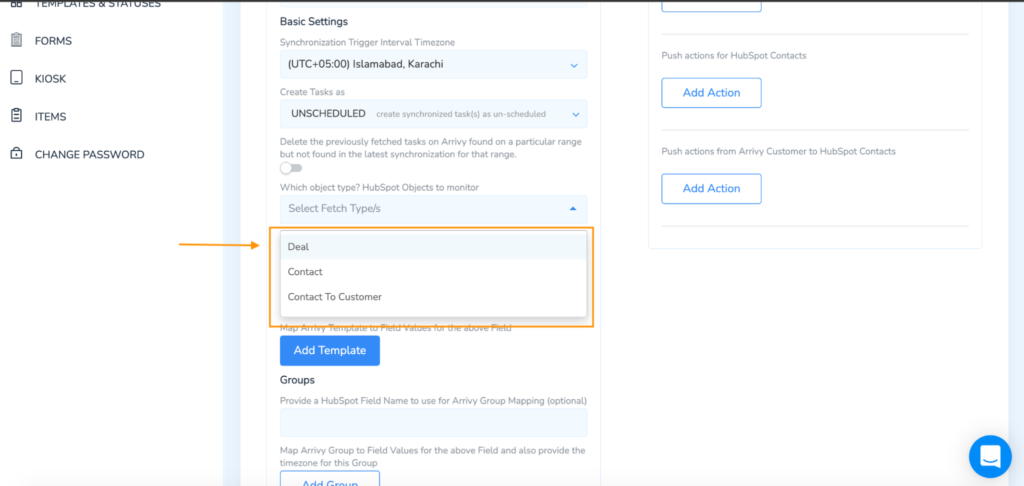
- Contact: Arrivy can also trigger task creation by monitoring Contact Lifecycle Stage or Lead Status inside HubSpot.
Contacts – Lifecycle Stages: In HubSpot, head to Settings → Properties → Contact Properties → Lifecycle Stage. From here, copy the LifeCycle Stages internal values over to Arrivy under Contact Lifecycle Stages in the hubspot integration. This will allow Arrivy to create/update a task every time the lifecycle stage changes in HubSpot based on provided life cycle stage or lead statuses. The integration flows two ways, so any changes made in either of the platforms can be reflected in the other.
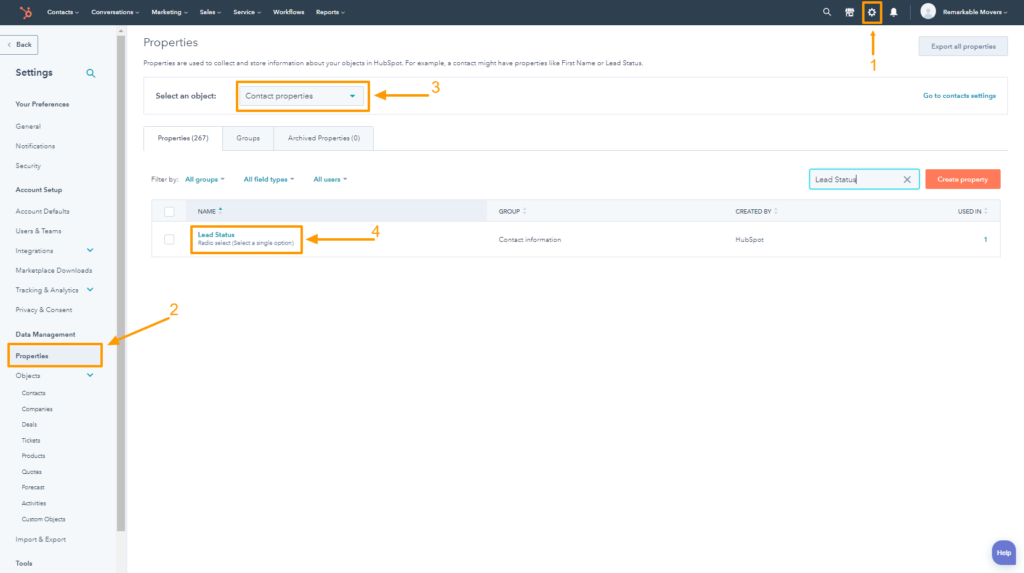
How to Access Lifecycle Stage Internal Ids
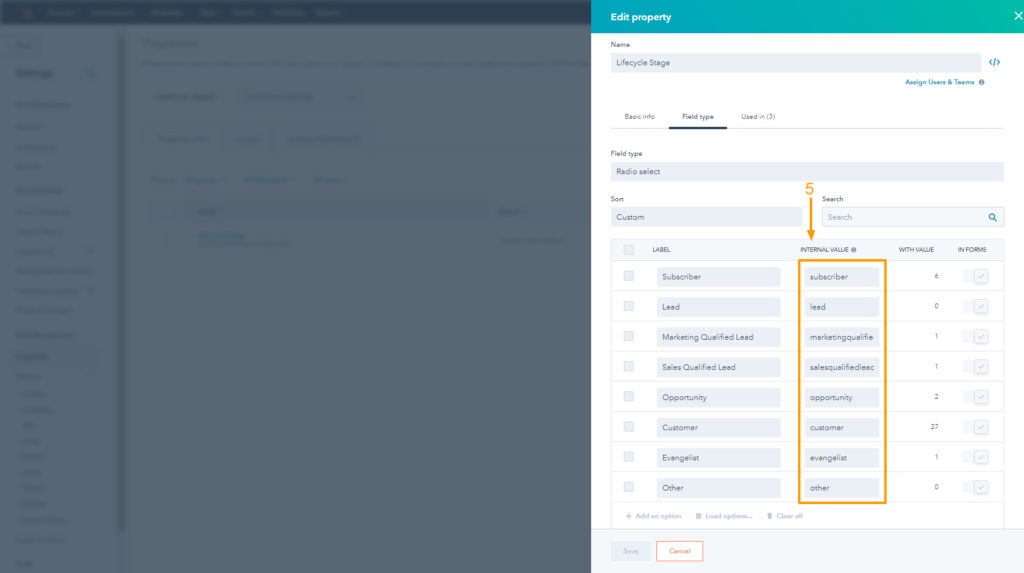
Lifecycle Stage Internal Ids Sample
Contacts: – Lead Status: As explained above, the same steps can be followed to map the contact lead statuses over to Arrivy to aid task creation. Simply head to Settings → Properties → Contact Properties → Lead Status, copy the internal ids and paste them in Arrivy. Arrivy will now trigger tasks once the lead status changes in HubSpot.

How to Access Lead Status Internal Ids
Creating & Viewing Tasks
Once the two services are linked:
Step 1: When you create a deal or contact in HubSpot, an Arrivy Task will be automatically created or updated based on the provided stage ids (mentioned above) on Arrivy in your linked account.
Step 2: You can track the Task’s progress by opening the deal in HubSpot and viewing the content of the Arrivy app panel that brings in the latest task information from Arrivy. You can see three buttons in the Arrivy app panel in HubSpot Deal. By clicking the first button, Create Arrivy Task, you can create a new Task in Arrivy. By clicking the 2nd button, Create Arrivy Task With Booking, you can create a booking task in Arrivy. By clicking the 3rd button, you can open the Task in Arrivy. You can only see one button in the panel containing the Arrivy Task URL in the Tickets. The task panel is shown below for reference.
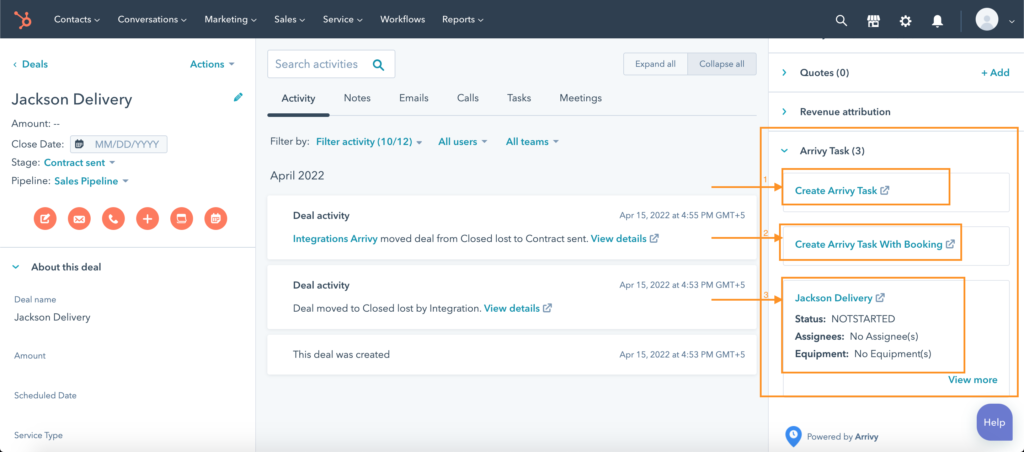
Arrivy Integration Panel Within HubSpot Deals
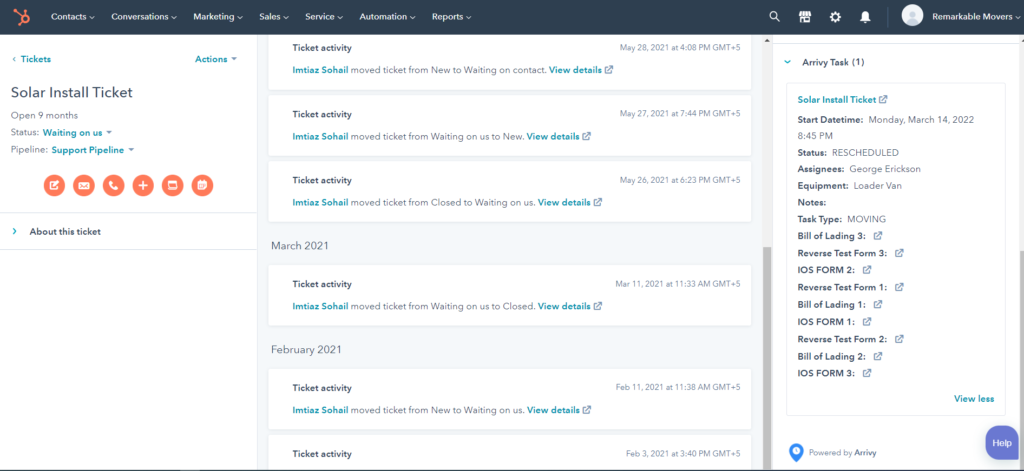
Arrivy Ticket App Panel Within HubSpot
Other Supported Items
Contacts
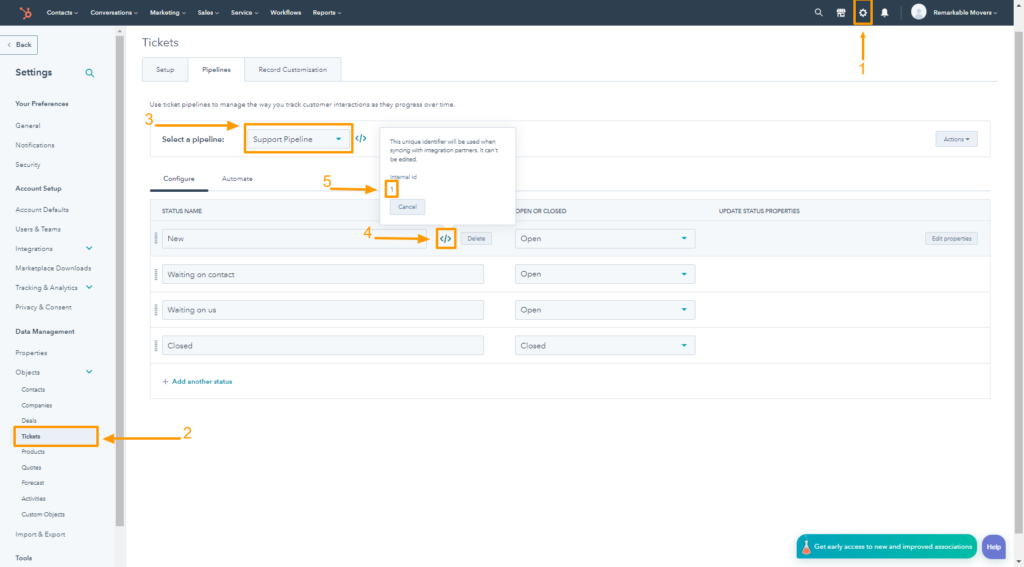
Go to Settings → Tickets → Select Pipeline and copy the internal id shown in the screenshot below. Arrivy supports two-way integration with Tickets allowing for a seamless data sync every time.
How to Access Tickets Internal Ids
Inside Arrivy once the internal id has been copy-pasted from HubSpot. The synchronization settings have to be enabled. The user can select the trigger interval and the date range per which the sync is triggered or fetch manually by clicking the button “Synchronize Tickets”.
![]()
Tickets Synchronization Settings Inside Arrivy
Other support:
- Custom Object: HubSpot custom objects can be imported to Arrivy and connected to modules such as deals, tickets, contacts, and companies.
- Companies: From HubSpot, you can import company data into Arrivy coupled with modules like deals, tickets, and contacts.
- Contact Meetings: Contact Meetings data can be brought over to Arrivy from HubSpot connected with modules like deals
- Products: All products inside HubSpot can be synced on a regulated interval with Arrivy. Whenever it’s time to update a product record, simply do it in Arrivy and watch the sync affect your products inside HubSpot. As shown in the screenshot below, the setup is quite simple, and the results allow for a great deal of ease.
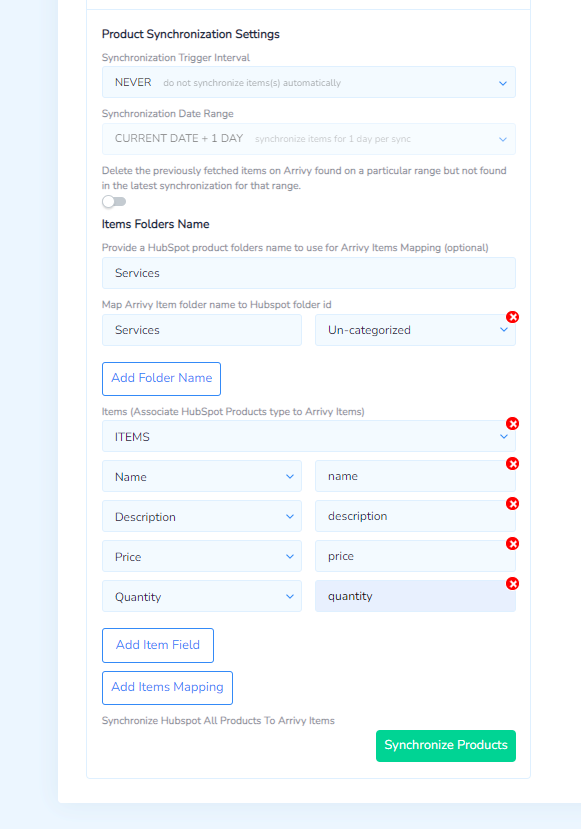
Products Synchronization Settings Inside Arrivy
- Files: Arrivy has the capability to send completed PDF of Digital Forms as a file attachment back to your desired pipeline in HubSpot. Helping you ensure that any information collected in the field is available for your team operating on HubSpot to view.
- Deal Line Items: Line items associated with your deals can also be mapped over to Arrivy, and any changes made inside Arrivy can also be synced back.
Create or Update Hubspot Deals and Tickets Against Arrivy Tasks
Arrivy creates or updates HubSpot Deals and Tickets automatically when a Task is created according to the Reverse Sync integration settings.
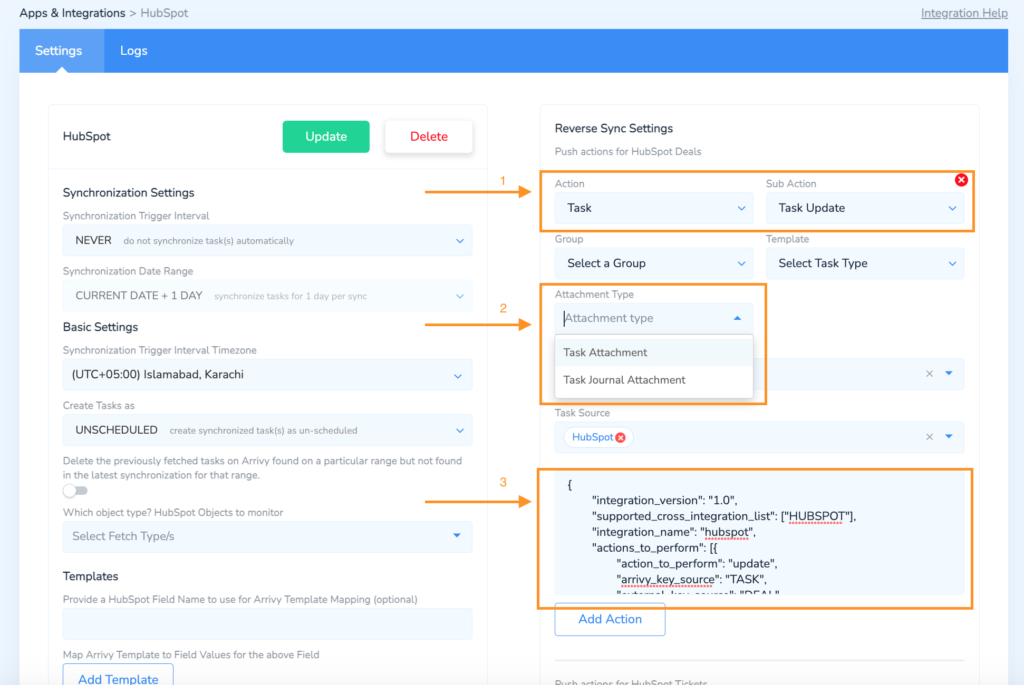
Step 1: Go to Settings → Apps & Integrations → HubSpot and in the Reverse Sync Settings panel on the right side as shown in screenshot below. Click on Add Action under the Push actions for HubSpot Deal.
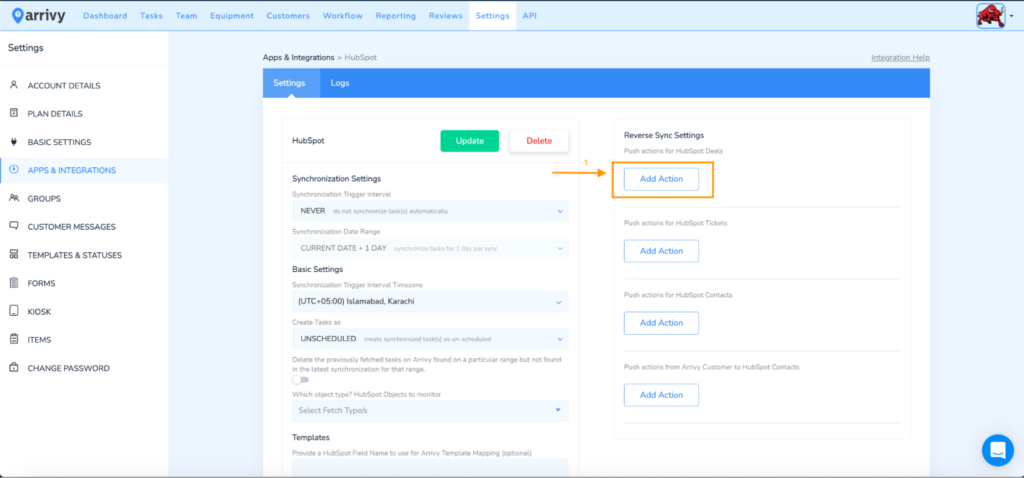
Reverse Sync (Push Data to HubSpot) Settings Panel Within Arrivy
Step 2: You can add an Arrivy Action and Sub Action based on when an action will be triggered. The idea is to configure a type of action upon which you want to create/update a Deal in HubSpot. Against each action, multiple sub-actions are available, and you can also configure multiple actions. An example of an action based on “Arrivy Task Create” is provided in the screenshot below.
Step 3: You can add Reverse mapping according to the required data that you want in the HubSpot Deal and then click the update button. Now, when an action occurs that has been pre-configured in Reverse Sync Settings, the Deal will automatically be created or updated in HubSpot.
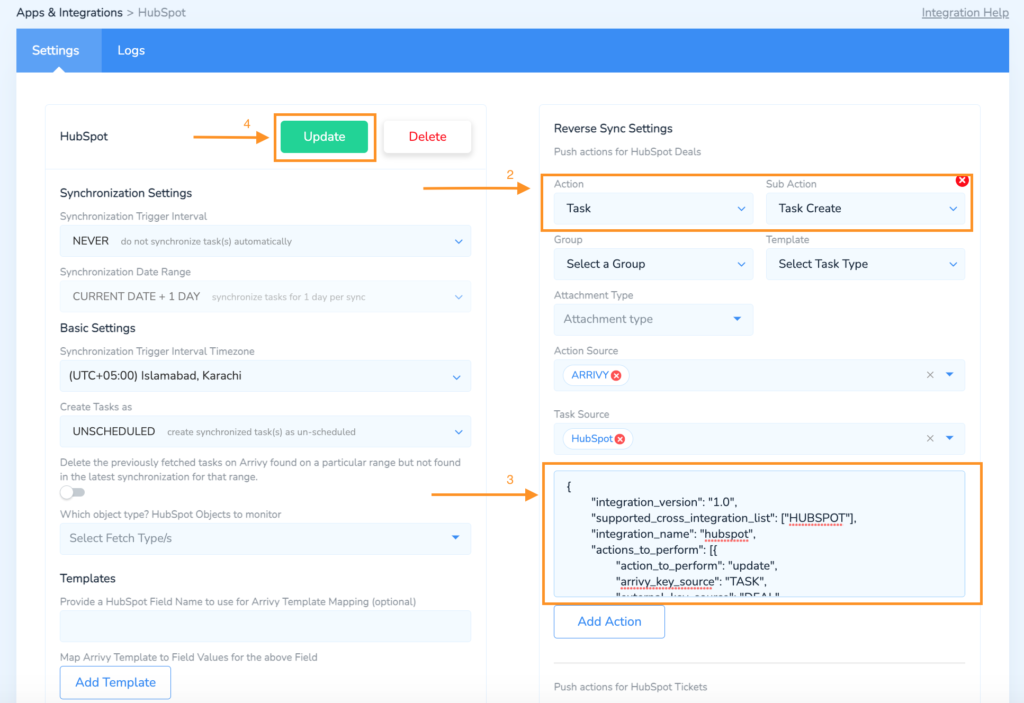
Reverse Sync Settings Panel Within Arrivy
Same procedure will be followed for creating/updating Tickets in HubSpot under the Push actions for HubSpot Tickets in the Reverse Sync Settings Panel. Screenshot is attached below for ticket mapping
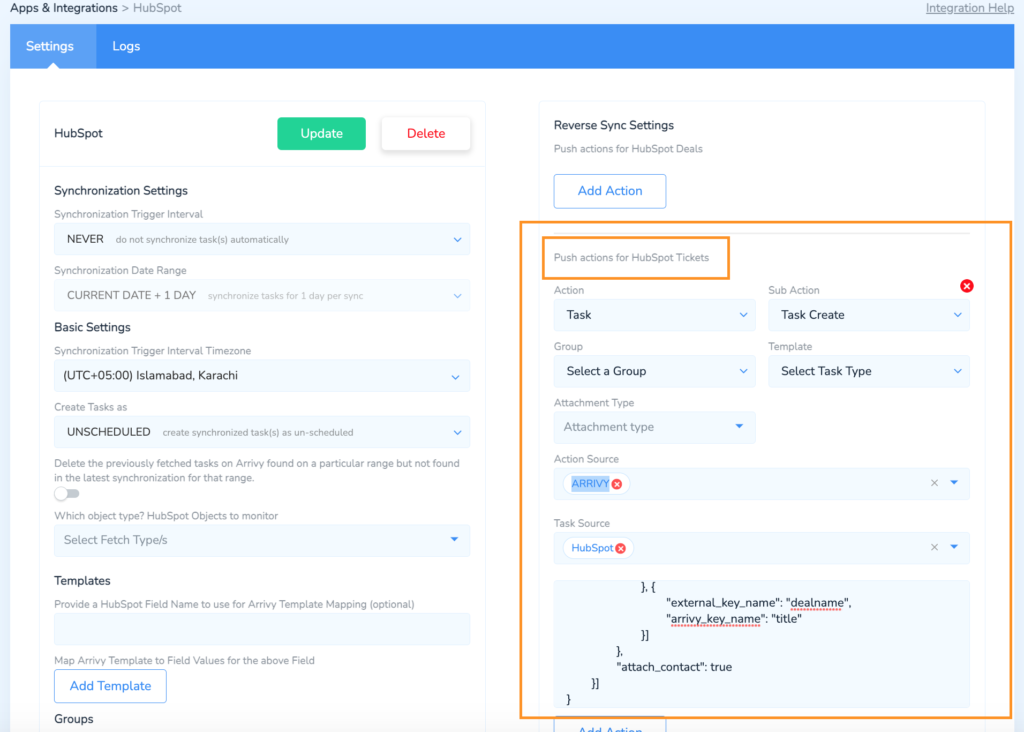
Ticket Mapping Inside Arrivy
Creating Contacts Against Arrivy Tasks
When you fetch a contact from HubSpot, an Arrivy Task is created. Suppose you change customer details in the task and update it. In that case, the HubSpot Contact will be updated automatically based on the mapping provided in the Reverse Sync actions in Arrivy HubSpot integration.
Note: When you edit the customer details, you mustn’t change the customer’s email.
Go to Settings → Apps & Integrations → HubSpot and in the Reverse Sync Settings panel on the right side as shown in screenshot below. Click on Add Action under the Push actions for HubSpot Contact.
Step 1: An Arrivy Action and Sub Action can be configured to trigger an action; you’re setting which type of action will trigger an update of a Contact in HubSpot. Against each action, multiple sub-actions are available, and you can also configure multiple actions. An example of an action based on “Arrivy Task Create” is provided in the screenshot below.
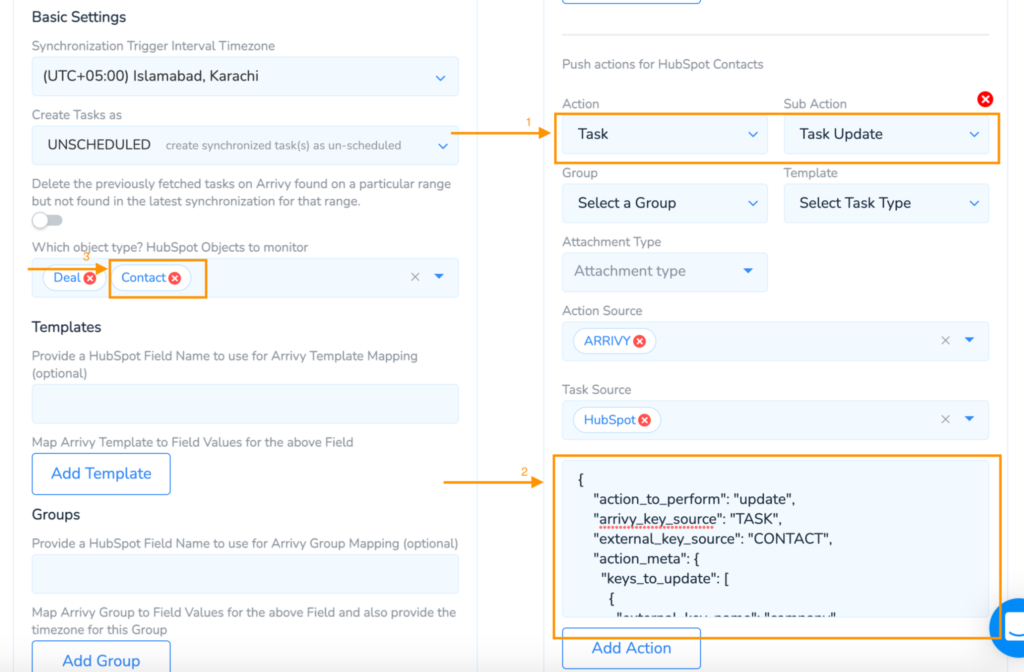
Reverse Sync Settings Panel for HubSpot Contact Within Arrivy
Step 2:You can add Reverse mapping according to the required data you want in the HubSpot Contact. When an action is performed that is configured in the reverse actions you configured in Reverse Sync Settings, the Contact will be updated in HubSpot automatically.
Step 3: Select Contact in the Object Types to monitor and then click the update button.
Upload Attachments From Arrivy to HubSpot Deal/Contact/Tickets
When you create a Task in Arrivy, attachments on the task will be uploaded on the Hubspot Deal/Contact/Ticket automatically.
To do this go to Settings → Apps & Integrations → HubSpot and in the Reverse Sync Settings panel on the right side as shown in screenshot below. Click on Add Action under the Push actions for HubSpot Contact/Deal/Ticket.
Step 1: You can add Action and Sub Action, basically here you are configuring on which type of action you want to upload attachments in HubSpot. Against each action multiple sub actions are available. You can see one of them as an example in the screenshot below.
Reverse Sync Settings Panel for Upload Attachments in HubSpot Within Arrivy
Step 2: You can select attachment types you want to send in HubSpot.
Step 3: You can add Reverse mapping for attachments you want to upload in the HubSpot Deal/Contact/Ticket and then click the update button. Now when you perform the same actions as you configured in Reverse Sync Settings the attachments will be uploaded to the HubSpot object.
Create Contact Against New Arrivy Customer
When you create a new customer in Arrivy in the customer tab, a HubSpot Contact will be created automatically based on the provided Reverse Sync actions in Arrivy HubSpot integration settings.
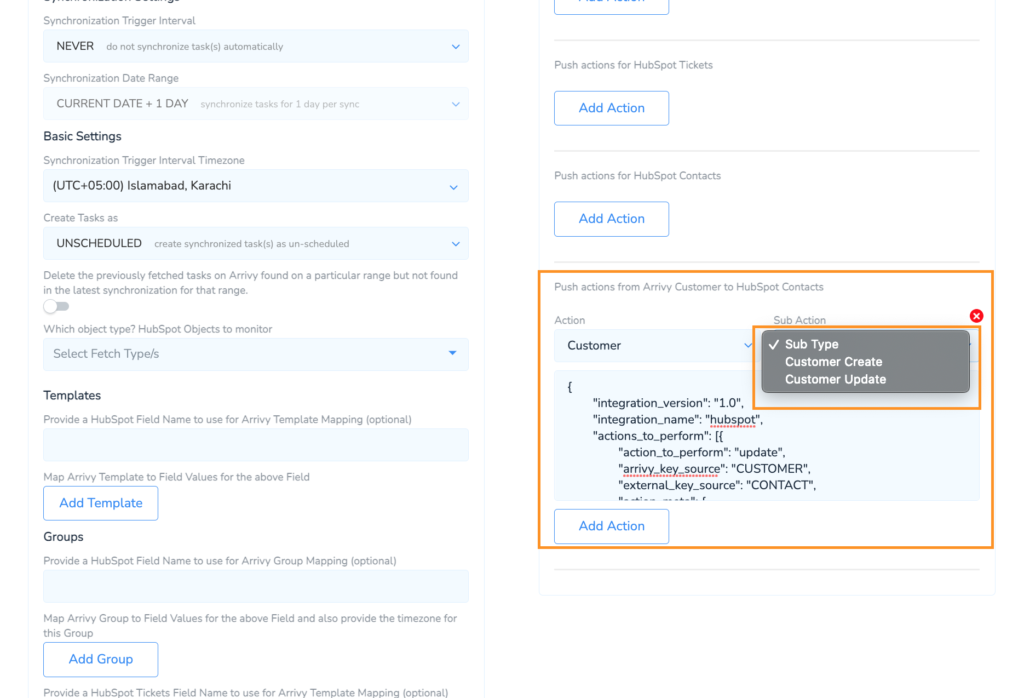
Step 1: Go to Settings → Apps & Integrations → HubSpot, and in the Reverse Sync Settings panel on the right side, as shown in the screenshot below, click on Add Action under the Push actions from Arrivy Customer to HubSpot Contacts.
Step 2: You can add an Arrivy Action and Sub Action on the basis of which an action will be triggered; basically, what you’re doing here is configuring on which type of action you want to create/update a Contact in HubSpot. Against each action, multiple sub-actions are available, and you can also configure multiple actions. An example of an action based on ‘Arrivy Customer Create’ is provided in the screenshot below.
Reverse Sync Settings Panel for Customer to HubSpot Contact Within Arrivy
Step 3: You can add Reverse mapping according to the required data you want in the HubSpot Contact and then click the update button. When you perform the same actions as you configured in Reverse Sync Settings, the Contact will be automatically created or updated in HubSpot.
Uninstalling/Deleting the Integration
In Arrivy
Users are in complete control when it comes to uninstalling the integration. Go to Settings → Apps & Integrations. From there, navigate to the HubSpot card and click installed.
HubSpot Integration Card Within Arrivy
In the new pop-up, simply hit delete to complete the uninstallation process.
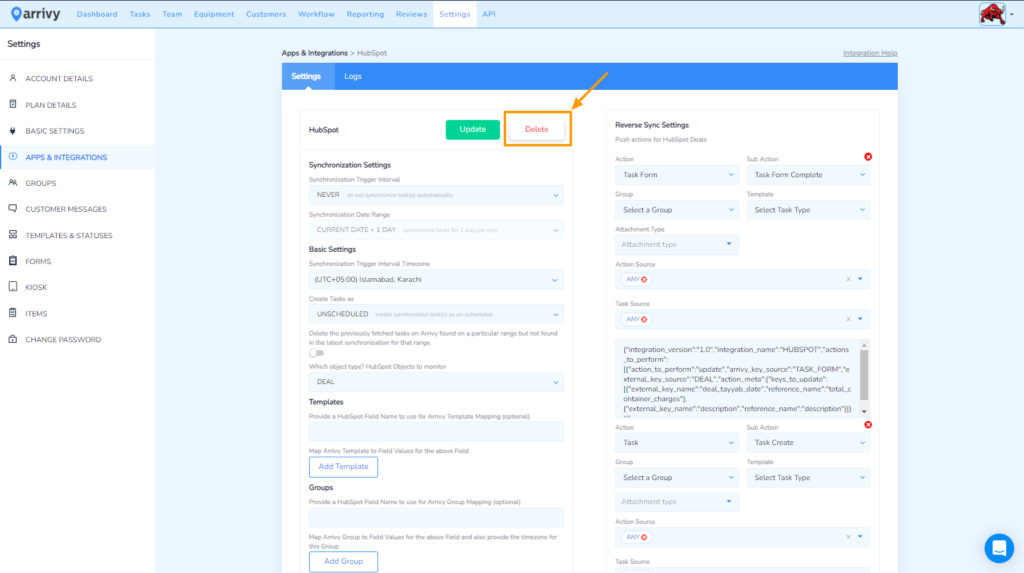
HubSpot Integration Settings Panel
After uninstalling the integration, all existing data within Arrivy can be deleted or exported as per the user’s request. Please reach out to us at support@arrivy.com if you’d like to learn more.
In HubSpot
To uninstall the integration within HubSpot, simply navigate to Settings → Integrations → Connect Apps → Action → Uninstall. All historical information will be retained within HubSpot, for instance, previous connected tasks history. However, no updated information will be brought over from Arrivy.
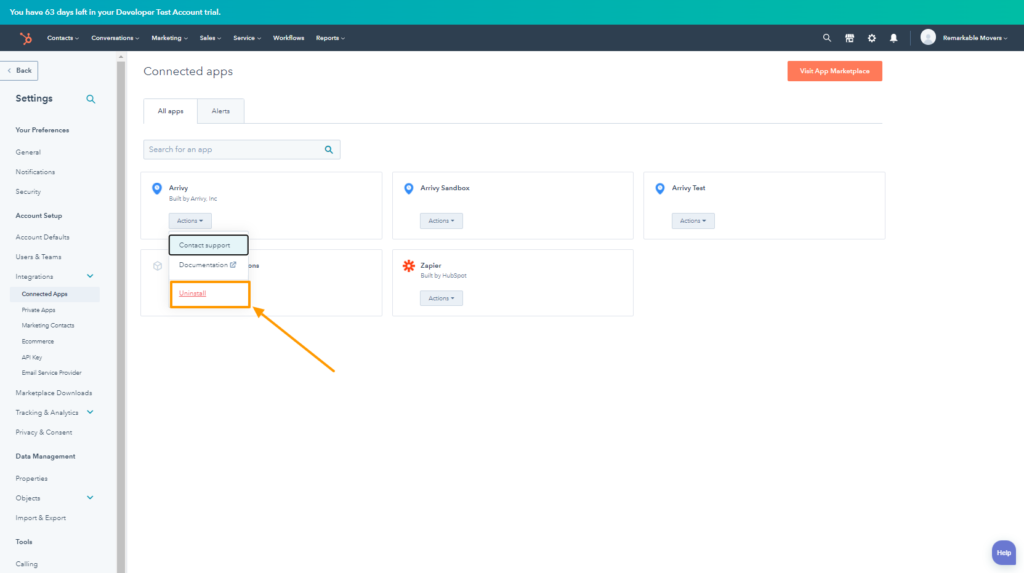
HubSpot Integration Settings Panel
For an in-depth demo of how the integration works, please book a time with us at support@arrivy.com.